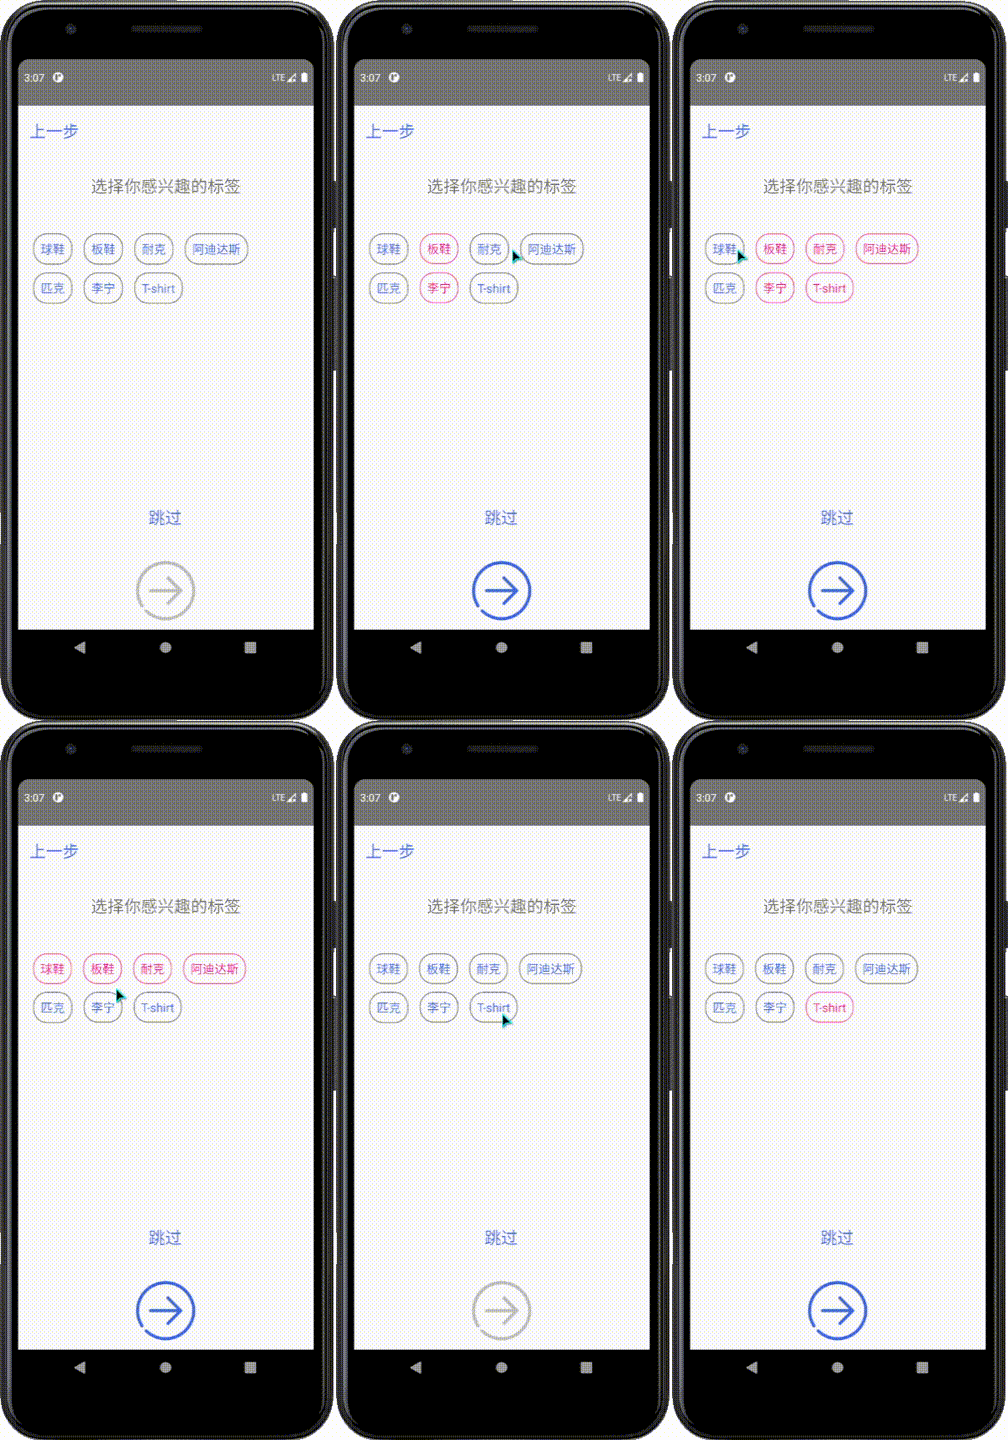
TagFlowLayout帮你快速完成Tag页
现在很多app的开发中总能见到tag的存在,电商平台的个性推荐,视频网站的视频分类,交友网站的个性标签等等。Tag选择页也是开发中常常需要用到的,实现的方法也有很多,例如:继承ViewGroup然后重写其中的某些方法或者继承自RelativeLayout。
但往往自己编写整一个自定义的TagView费时费力,所以我就到github上翻了翻有没有已经封装好的用于实现Tag页的流式布局呢?于是就找到了这个鸿洋dl封装好的库(github地址:这里)虽然已经在18年就停止维护了,但是现在也是十分好用的一个封装布局。
效果展示

准备工作
第一步在gradle导入库
dependencies {
    implementation 'com.hyman:flowlayout-lib:1.1.2'
}
其实就一步(o゚▽゚)o
XML资源文件与布局
创建界面的布局文件,并在布局文件中添加TagFlowLayout组件,示例代码如下:
<com.zhy.view.flowlayout.TagFlowLayout
    android:id="@+id/tag_container"
    android:layout_width="match_parent"
    android:layout_height="0dp"
    android:layout_marginTop="28dp"
    android:padding="20dp"
    android:background="@null"
    app:layout_constraintEnd_toEndOf="parent"
    app:layout_constraintHeight_percent="0.5056"
    app:layout_constraintHorizontal_bias="0.0"
    app:layout_constraintStart_toStartOf="parent"
    app:layout_constraintTop_toBottomOf="@+id/tag_text" />
在layout文件夹下创建一个用于包含标签的Textview样式,示例代码如下:
<?xml version="1.0" encoding="utf-8"?>

<TextView xmlns:android="http://schemas.android.com/apk/res/android"
    android:layout_width="wrap_content"
    android:layout_height="wrap_content"
    android:singleLine="true"
    android:textColor="#4169E1"
    android:layout_marginRight="15dp"
    android:textSize="16sp"
    android:padding="10dp"
    android:layout_marginBottom="10dp"
    android:layout_marginEnd="15dp" />
值得注意的是在样式文件中根组件必须是Textview而不是其他的布局组件,否则会导致无法识别!!!
创建一个用于TextView的边框样式,分别创建选中时和未选中时的样式。这个演示是在drawable文件夹下创建了根组件为shape的绘图资源,其中选中时的边框示例代码如下:
<?xml version="1.0" encoding="utf-8"?>
<shape xmlns:android="http://schemas.android.com/apk/res/android">

    <!-- 设置背景色 -->
    <solid android:color="@null" />

    <!-- 设置一个边框 -->
    <stroke
        android:width="4px"
        android:color="#FF69B4" />
    <!-- 设置四个圆角的半径 -->
    <corners
        android:bottomLeftRadius="50px"
        android:bottomRightRadius="50px"
        android:topLeftRadius="50px"
        android:topRightRadius="50px" />
    <!-- 设置一下边距,让空间大一点 -->
    <padding
        android:bottom="10dp"
        android:left="10dp"
        android:right="10dp"
        android:top="10dp" />

</shape>
值得注意的是在<padding>标签下的值要与Textview样式一致,不然会导致选中后布局更改!
Java代码实现
创建一个容器类型变量用于保存每一个标签,这里使用的是ArrayList
往容器中添加所需要添加的标签描述
创建TagFlowLayout接收XML布局中的组件,并创建一个Adapter
重写Adapter中的
public View getView方法,为标签应用TextView样式重写Adapter中的
public void onSelected方法与public void unSelected方法,实现选中标签以及取消标签对应的方法(包括样式的更改)示例代码如下:
    @Override
    public void onActivityCreated(@Nullable Bundle savedInstanceState) {
        super.onActivityCreated(savedInstanceState);
        initController();
        initTag();
        initListener();
    }
    //初始化控件
    private void initController(){
        tag_list = new ArrayList<>(); //标签容器

        tag_container = getActivity().findViewById(R.id.tag_container);
    }

    //添加标签描述
    private void initTag(){
        tag_list.add("球鞋");
        tag_list.add("板鞋");
        tag_list.add("耐克");
        tag_list.add("阿迪达斯");
        tag_list.add("匹克");
        tag_list.add("李宁");
        tag_list.add("T-shirt");
    }

    //更改Adapter
    private void initListener(){
        //设置TagFlowLayout的Adapter
        tag_container.setAdapter(new TagAdapter<String>(tag_list) {
            @Override
            public View getView(FlowLayout parent, int position, String s) {
                //获取自定义TextView样式
                TextView tv = (TextView) LayoutInflater.from(parent.getContext())
                        .inflate(R.layout.tag_item, parent, false);
                //更改标签内容
                tv.setText(s);
                return tv;
            }

            @Override
            public void onSelected(int position, View view) {
                //更改选中后标签的边框
                view.setBackground(getResources()
                                   .getDrawable(R.drawable.checked_border));
                //更改选中后文字颜色,其中 0xFF0000ee FF是透明度 0000ee是RGB16进制值
                ((TextView) view).setTextColor(0xFFFF1493);
            }

            @Override
            public void unSelected(int position, View view) {
                //恢复取消选中后标签的边框
                view.setBackground(getResources()
                                   .getDrawable(R.drawable.unchecked_border));
                //恢复取消选中后文字颜色
                ((TextView) view).setTextColor(0xFF4169E1);
            }
        });
    }
杂谈
鸿洋dl的库有一个很不好的地方就是对小白(就是我)比较不友好,不像其他github项目手把手教学如何使用,于是就有了这篇博文。跟着鸿洋dl的教程在研究如何使用自定义TextView样式的时候真的摸索了好久,一直报空指针错误,后面才发现跟着鸿洋dl使用LayoutInflater变量却没有实例化。然后实例化后就发现不需要使用变量也可以 XwX ,折腾了半天又发现有转换错误,后来才发现自定义TextView样式需要根组件是TextView而不能是其他的布局组件←这个相当重要啊啊啊啊!一番折腾总算把demo给做出来了。


