


安卓前端研习——底部导航栏 BottomNavigationView
做项目的时候总会遇到一个问题就是多页面的转换,现在的app大部分都有这一个比较优秀而且实用的底部导航栏如何快速实现一个好看而且简单实现的导航栏总是一个项目的开头。
以下是实现效果:

布局文件实现
首先我们需要在build中导入BottomNavigationView的支持
implementation 'com.google.android.material:material:1.0.0'
然后创建一个布局文件,中间加入BottomNavigationView组件,这里使用的布局方式是约束布局所以会出现app包中的语句
    <com.google.android.material.bottomnavigation.BottomNavigationView
        android:id="@+id/navigation_bar"
        android:layout_width="0dp"
        android:layout_height="0dp"
        app:itemIconSize="20dp"
        app:labelVisibilityMode="labeled"
        app:layout_constraintBottom_toBottomOf="parent"
        app:layout_constraintEnd_toEndOf="parent"
        app:layout_constraintHeight_percent="0.0719"
        app:layout_constraintWidth_percent="1" />
导入导航栏需要的图标和文字,需要先创建一个menu文件夹以及一个menu的资源文件
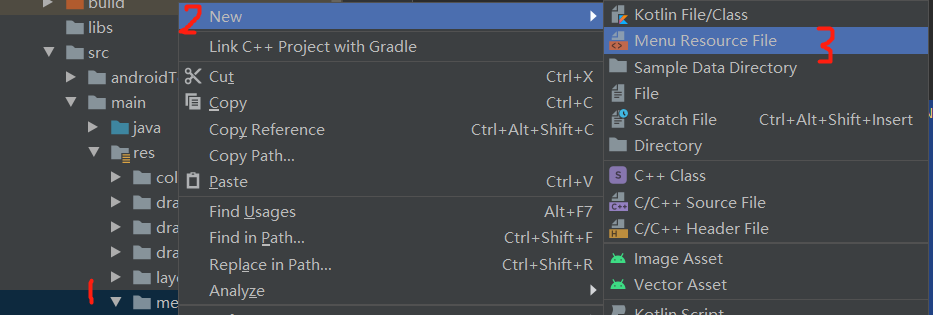
创建好了之后需要利用menu的方式来对我们的底部导航栏进行布局
<?xml version="1.0" encoding="utf-8"?>
<menu xmlns:android="http://schemas.android.com/apk/res/android"
    xmlns:app="http://schemas.android.com/apk/res-auto">
    <item
        android:id="@+id/home_home"
        android:icon="@drawable/home_nc"
        android:enabled="true"
        android:title="首页"
        app:showAsAction="ifRoom"/>
    <item
        android:id="@+id/message"
        android:icon="@drawable/message_nc"
        android:enabled="true"
        android:title="消息"
        app:showAsAction="ifRoom"/>
    <item
        android:id="@+id/my"
        android:icon="@drawable/my_nc"
        android:enabled="true"
        android:title="我的"
        app:showAsAction="ifRoom"/>
</menu>
创建好菜单资源文件后我们需要在布局文件中的BottomNavigationView引用它,需要加上一行代码
app:menu="@menu/navigation_elements"
这行代码就是引用了刚刚我们创建的菜单资源文件,其中navigation_elements是资源文件的文件名。
至此我们的底部导航栏布局的雏形就完成了,接下来就是用户按键时的反馈。反馈对于用户体验而言也十分重要,那么如何实现选中和未选中是不同颜色的效果呢?
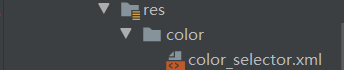
这里就要使用到安卓资源文件中的选择器(selector)了,首先我们需要在res文件夹中新建一个color文件夹,并新建一个选择器资源文件
在选择器资源文件中我们要选择选中时的颜色用16进制RGB表示,示例代码如下:
<?xml version="1.0" encoding="utf-8"?>
<selector xmlns:android="http://schemas.android.com/apk/res/android">
    <item android:state_checked="true" android:color="#3D3BFD"/>
    <item android:state_checked="false" android:color="#646464"/>
</selector>
需要注意的是图标被选中的状态是state_checked而不是state_selected,通过配置false和true的值实现不同状态下图标颜色的变化。然后我们需要在布局文件中的BottomNavigationView中引用该选择器,加入相应代码后最终为
    <com.google.android.material.bottomnavigation.BottomNavigationView
        android:id="@+id/navigation_bar"
        android:layout_width="0dp"
        android:layout_height="0dp"
        app:itemIconSize="20dp"
        app:itemIconTint="@color/color_selector"
        app:itemTextColor="@color/color_selector"
        app:labelVisibilityMode="labeled"
        app:layout_constraintBottom_toBottomOf="parent"
        app:layout_constraintEnd_toEndOf="parent"
        app:layout_constraintHeight_percent="0.0719"
        app:layout_constraintWidth_percent="1"
        app:menu="@menu/navigation_elements" />
其中app:itemTextColor是控制不同状态下菜单文件中的title字体的颜色,app:itemIconTint是控制不同状态下菜单文件中的图标的颜色。
Java逻辑实现
接下来就是页面转换的逻辑实现,首先包含BottomNavigationView的布局文件中需要有一个layout用于放置不同的fragment,例如布局文件代码如下, 我们通常使用FrameLayout来承载Fragment
<?xml version="1.0" encoding="utf-8"?>
<androidx.constraintlayout.widget.ConstraintLayout
    xmlns:android="http://schemas.android.com/apk/res/android"
    xmlns:app="http://schemas.android.com/apk/res-auto"
    android:layout_width="match_parent"
    android:layout_height="match_parent">

    <com.google.android.material.bottomnavigation.BottomNavigationView
        android:id="@+id/navigation_bar"
        android:layout_width="0dp"
        android:layout_height="0dp"
        android:theme="@style/SmallRippleWhite"
        app:itemIconSize="20dp"
        app:itemIconTint="@color/color_selector"
        app:itemTextColor="@color/color_selector"
        app:labelVisibilityMode="labeled"
        app:layout_constraintBottom_toBottomOf="parent"
        app:layout_constraintEnd_toEndOf="parent"
        app:layout_constraintHeight_percent="0.0719"
        app:layout_constraintWidth_percent="1"
        app:menu="@menu/navigation_elements" />

    <FrameLayout
        android:id="@+id/fragment_container"
        android:layout_width="0dp"
        android:layout_height="0dp"
        app:layout_constraintHeight_percent="0.9281"
        app:layout_constraintStart_toStartOf="parent"
        app:layout_constraintTop_toTopOf="parent"
        app:layout_constraintWidth_percent="1">
    </FrameLayout>

</androidx.constraintlayout.widget.ConstraintLayout>
然后对导航栏进行java逻辑实现,代码如下:
public class NavigationActivity extends AppCompatActivity  implements BottomNavigationView.OnNavigationItemSelectedListener {

    @Override
    protected void onCreate(Bundle savedInstanceState) {
        super.onCreate(savedInstanceState);
        setContentView(R.layout.activity_main);
        BottomNavigationView navigation_bar = findViewById(R.id.navigation_bar);
        navigation_bar.setOnNavigationItemSelectedListener(this);
    }

    private void switchFragment(Fragment fragment){
        FragmentManager fragmentManager = getSupportFragmentManager();
        FragmentTransaction transaction = fragmentManager.beginTransaction();
        transaction.replace(R.id.fragment_container, fragment);
        transaction.commit();
    }

    @Override
    public boolean onNavigationItemSelected(@NonNull MenuItem menuItem) {
           switch (menuItem.getItemId()){
            case R.id.home_home:
                switchFragment(new FragmentOne);
                break;
            case R.id.message:
                switchFragment(new FragmentTwo);
                break;
            case R.id.my:
                switchFragment(new FragmentThree);
                break;
            default:
                return false;
        }
    }
}
注意现将布局文件中的BottomNavigationView实例化然后为他添加选择监听,即onNavigationItemSelected的方法。switch子句中的case是菜单文件各个图标的id,根据选择不同的图标切换到不同的fragment。